Lynnette Parker
Independent Stampin' Up! Demonstrator
tpshelf21@gmail.com

Friday, October 26, 2012

October 29th - Sell a Stamp Spooktacular!


SAVE THE DATE 10/29!!!! What an ubelievable deal! For one day only, you will get 15 percent off almost every stamp we sell! The goal is to sell more stamps in a single day than ever before!
Here are the details: (Updated 2:35 PM (MT) 10/25/2012)
  • On October 29th starting at 12:00 AM (MT) and ending at 11:50 PM (MT), almost every stamp we sell will be 15 percent off.
This means all stamps in the current catalogs including
    • Background stamps
    • Personalized name stamps
    • Incentive stamp sets from the supply list
    • Cookie press stamps
    • Single-image stamps
This DOES NOT include
    • Hostess sets
    • Bundled stamp sets
    • Digital stamp brush sets
  • There is no minimum purchase, and no limit to the number of stamps you can order.

  • The online store will have all the correct pricing so all you have to do is get out your wish list and click on the "SHOP NOW" link on the right side bar and start saving! Happy Halloween everyone.

    Wednesday, October 24, 2012

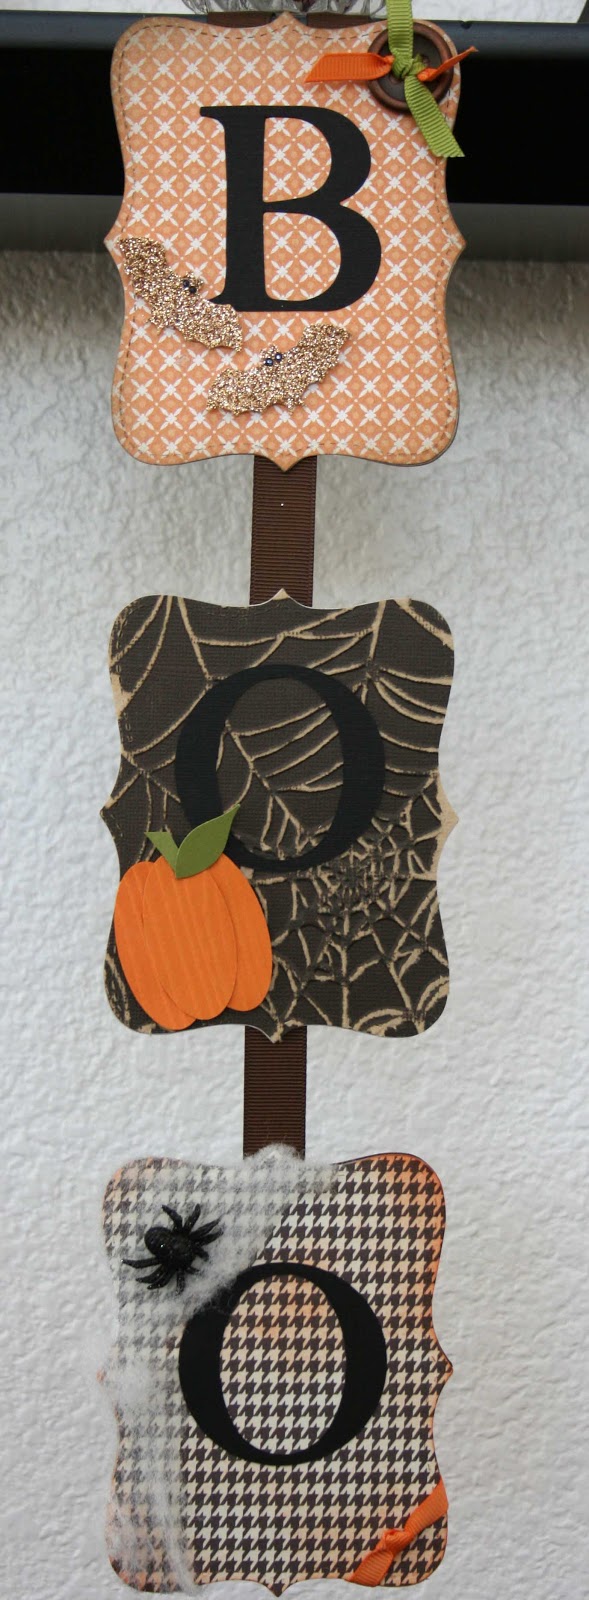
    "BOO" Halloween Fun

     Hello friends. Long time no post. Whew, this blog thing is much more work than I anticipated. How do these ladies do it??? Posting daily, kudos to all of you out there who manage it! Anyhoo, just wanted to share what me and my gals did a couple of weeks ago. We made this super cute "BOO" sign for some Halloween fun. We also made a Halloween card that I will be posting tomorrow. (I know what you are thinking...you will believe it when you see it right?) I used the Top Note die (#113463) to cut out chipboard and then the DSP. The letters are from the retired Serif Essentials die set.
    Aren't the bats cute??? Some of the ladies used black cardstock instead of the Champagne glitter and that was super cute as well. I used small contraband rhinestones and colored them with a black sharpie marker for the eyes. The button in the corner is one of our new Brushed Bronze (#127833) buttons tied with some retired old olive and pumpkin pie ribbon. Great way to get rid of some of that retired ribbon ladies!
    On this piece, I used the Core'dinations DSP (#127848 in espresso) with the spiderweb emboss folder (#120889) and then scruffed away! The pumpkin is made by using the large oval punch (#119855) x 3 pieces and then I ran it thru the woodgrain emboss folder (#127821) for texture. The leaf and stem were made using the blossom petals builder punch (#121808).
    For the final piece, I used some store bought spiderweb and spider and some more retired pumpkin ribbon. I also sponged pumpkin pie on this piece of DSP to make it look a littler spookier. All three pieces were strung together with more retired ribbon (5/8" espresso grosgrain) and some oober tape (sticky strip for everyone out there that isn't familiar with Lynnette speak ;) Hope you enjoyed the project today. Get out some of your retired ribbons and your Big Shot and have some of your own Halloween fun!! have a great day!

    Tuesday, October 2, 2012

    October promotion

    Hello all! Happy October to you. Not that our weather is cooperating with fall, but...... Just wanted to quickly share this months promotion with you. Stampin Up has added some new bundles to go with the Ornament Keepsakes set. You can choose from the set, die, and Candlelight DSP or just the set and DSP and receive the matching paper piercing pack for free! Love, love, love those pierce packs! For more details just click on the "Shop Now" link on the sidebar and then the "Our Christmas Gift to You" link for all the scoop. Hope you have a great day.

    Tuesday, September 25, 2012

    September Swap

     Good morning everyone! Hope you all had a great weekend. Today's project is my card for my September swap group (http://openswappers.blogspot.com/). Great group of ladies and projects. This month I used the Hello, Doily background stamp. I have seen so many great samples with this stamp and it was my first time working with it. Love how lacy it is don't you? I stamped the image with versamark and then clear embossed it. I then masked it and stamped En Francais with Crumb Cake. The sponging was then done with Marina Mist and Crumb Cake. If you have never tried this technique, it is so much fun and gives you a great effect. You can clear emboss any image, sponge any color over it, then wipe off with a paper towel and your clear embossed image just pops. I also sponged all vanilla pieces with Crumb Cake, they were just too bright otherwise. I added some texture with the Fancy Fan emboss folder and some bling with a pearl, button, and ribbon (I know I can't believe this ribbon is retired either :(  The tag was made with the Modern Label punch, but I shortened it and added the button to the end.
    Don't forget to joosh (is that a word? I sure use it alot) up your inside of your card too. I used the same emboss folder and ribbon as I did on the front of the card. Hope you enjoyed the project today. Have a great week all!

    Friday, September 21, 2012

    Pointsettia

    Hello all! Over a week since my last post? What? Where does the time go?? Crazy, how did I ever have time to work??? Hope your week went well. Today's post is another Christmas card for next weeks workshop. I used the new Watercolor Winter and Greetings of the Season sets in the Holiday catalog. I did mention that this Holiday catalog is unbelievable right?? The DSP comes from three different packs - Letters to Santa (retired), Snow Festival (Holiday catalog), and Festival of Prints (Holiday catalog). The card base is Crumb Cake as well as the ink on the "Noel" piece that comes from the Everything Eleanor stamp set. The "Noel" was stamped in Old Olive. Don't you just love how the Cherry Cobbler and Primrose Petals colors compliment each other on the flowers? Love that combo! Just a hint on these two step stamps, even though they are clear stamps I find it so much easier if I use my stamp a ma jig and make a template. Otherwise it just never looks right. So drag out that dusty old tool! It still comes in handy.

    Don't forget to dress up the inside too! Just a piece of DSP with an edgelit and a couple pieces of cardstock and vuala! Hope you enjoyed the project today. Have a great weekend!

    Thursday, September 13, 2012

    Christmas Ornaments

     Good morning everyone! Today's project is Christmas card for my next workshop. Love the way this one turned out. It has that shabby chic thing going on. I used the Ornament Keepsakes set and dies with Island Indigo ink. The background piece uses the direct brayer to emboss folder technique with Crumb Cake ink. Great technique for that vintage look. All you do is ink up your brayer well and cover the debossed side of the emboss folder with ink, then insert your cardstock and run thru your Big Shot. Vuala! Easy technique for very dramatic effect. The two emboss folders I used were the stripes for the ornament background piece and the lacy brocade on the larger background piece. The sentiment comes from the must have More Merry Messages set. All vanilla pieces were mucked up with a sponge and Crumb Cake. Just love the ruffled ribbon and the pearls, very elegant.
    Don't forget to decorate the inside of your card! I used Crumb Cake on the sentiment (also from More Merry Messages) and Island Indigo for the ornament. The border was made with the scallop trim border punch and the string was from an old ornament set I had in my stash, but could easily be made by hand with a Crumb Cake marker. Hope you enjoyed the project today. It's almost the weekend!!! Have a great day.

    Wednesday, September 5, 2012

    Blooming with Kindness

    Good Hump day morning everyone! Up early with my son to get him off to school after being sick yesterday. The air is cool and the geese are quite active, can't wait until fall has arrived for good (not just in the am!). I thought I would take a step away from posting Christmas cards today. This is a case from ????, sorry I searched and searched and can't remember what blog I found this inspiration on. I search so many blogs that sometimes the exact blog that gave me my inspiration escapes me. Thanks to whoever you are! Anyhoo, I used the Blooming with Kindness set (Item #126422) for this card. Isn't this set just fabulous??? Love the flower and all the words. A little hint on the flower stamp, I removed the stem to make it easier to use. I still have the stem with the set but when just using the flower image (which will be most of the time), I don't have to fight with trying to either mask or use markers to color it separately.

    The colors I used were Baja Breeze, Marina Mist (the new reformulated pad/ink - what a difference the new ink formula makes!), Midnight Muse, and Wild Wasabi. I first stamped the flowers and sponged a little into the centers to mute some of the "white" that was glaring at me. Then masked the flowers and used large post it notes to cover around the edges to make a "frame" of white around the edges. Then I sponged with the Wild Wasabi. After removing the masking, I used my Color Spritzer tool (Item #107066) with the Midnight Muse marker to get the speckled look (was a little heavy handed on the spritz, would have a liked it to be a little less). I did try the new spritzers that Stampin Up has now but because you have to mix the ink with a liquid, it wasn't the dark spritz that I was looking for. The sentiment is stamped in Midnight Muse as well.


    In the center of the flowers I put a pretty heavy blob of dazzling details and then put the pearl on top. Love the little extra it added to the card. Gotta have a little bling right?

    For the inside of the card I just stamped the flowers and then a bit more spritz. Hope you enjoyed the project today. Have a great day!